WordPress and Images
WordPress is actually pretty smart when it comes to images.
Images have two main sizes associated with them:
- Image file size, which is measured in KB or MB
- Image dimensions, measured in pixels (px)
The two values are related – the smaller the image, the lower the file size.
When you upload an image, WordPress by default creates copies of that image in standard dimensions. You can see these in the Settings > Media screen.
The defaults are:
- Thumbnail size is 150 x 150 px, and cropped to the exact dimensions.
- Medium size: maximum 300 x 300 px.
- Large size: 1024 x 1024 px.
WordPress takes your original image and makes these smaller versions, which are stored in your wp-content/uploads folder.
 When you add an image to a post or page, WordPress will prompt you to choose the size to insert.
It makes sense to choose an image closest to the size you want on the page. If you don’t have the exact size, choose the next size up. Once it’s added you have the option of editing it and scaling it down to a custom size.
Adding additional image sizes
The Simple Image Sizes plugin lets you add additional standard image sizes, and it also will regenerate all your images for the sizes if you make a change.
By default it will show you all the image sizes in your Settings > Media, including any extra ones built into your theme.

You can change the Media default sizes if you desire. BUT if you do, they will only take effect for newly uploaded images. Existing ones are unaffected.
You can also add your own sizes, but don’t create too many – remember each size is created and stored for each image. Make sure that you check the box marked Show in post insertion ? for any non-standard sizes if you want to include them in posts or pages.
The Regenerate Thumbnails feature will resize all your images to the new sizes. Use this if you want the new sizes available across all your images.
Great. What could possibly go wrong?
Sometimes, we users can do dumb things.
One of them is to put images straight from your camera on to your posts or pages and insert them full size.
Why is this bad?
Images from your camera are designed for print.
Bigger images and bigger file sizes are great for photographers – they get better prints.
Web ≠ Print!
 Web pages are the opposite. They need to be as small as reasonably possible so that they load speedily. This is particularly important for mobile devices.
The problems with large images:
- Your pages will load slowly, which could deter visitors.
- Your site’s SEO could be negatively affected – page speed is a ranking factor.
- Your mobile visitors will use up their data allowance faster if your pages are big.
- Your images will not have meaningful filenames.
Featured images
Featured images, also known as post thumbnails, are a special type of image that you can attach to posts or pages. They are not enabled in every theme.
Themes which use them will show an image on the blog page by each post – usually above the post or to the side of it. The individual posts may show the featured image too, but not necessarily.
The size of the featured image shown is theme-dependent. On my blog, the featured images are thumbnail size – 150px wide. The height varies dependent on the shape of the image chosen.
When we add a featured image, we don’t get the option to select the size – it’s predefined.
So if you upload a 6000 x 4000 px 7.2MB image on to your site and add it as the featured image to a post, what you will get?
A very slow loading page and unhappy users.
How do I know what dimensions my featured image should be?
There are a few ways:
Non-geeky ways
Check your theme documentation.
Install Simple Media Sizes, as mentioned before – this will show you what size the featured image (post thumbnail) is.
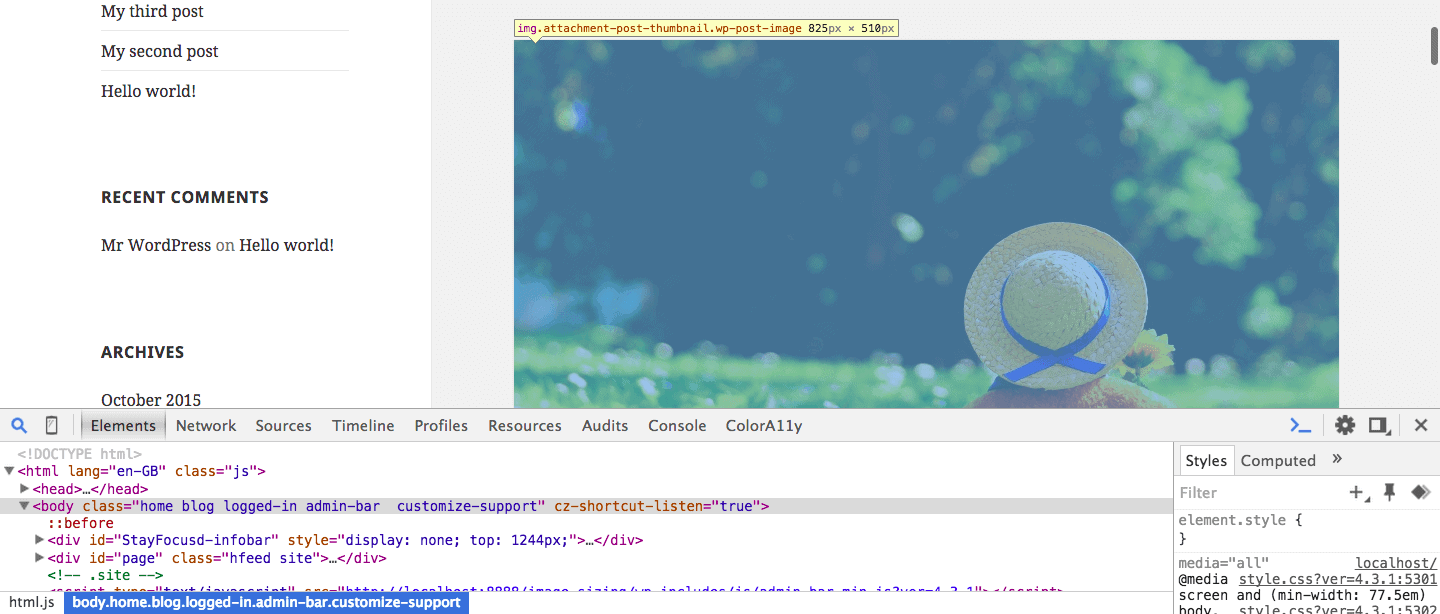
For example, in the Twenty Fifteen theme the featured images are always 825px wide x 510 px high.
Geeky way
Using Chrome browser, open Developer Tools (F12 on Windows, CMD-alt-I on Mac).
Click on the spyglass icon.
Roll your mouse over the image and the dimensions will be shown.

Other images for posts and pages
I recommend not making your images wider than your theme. You can check the size by reading your theme documentation or by using the Developer Tools method above.

As a rule of thumb, many themes are built on a 960px grid, but wider themes (1200px width or more) are becoming more common.
Warning: changing theme
If you decide to change your theme at a later date and move to a wider theme, the featured image size will likely be different and your post/page images may look too small. It’s a good idea to always hang on to the original images in case you need to do some re-editing later.
Remember:
You can make a large image smaller but you can’t make a small image larger.
How should you optimize your images for your WordPress site?
You need to be mindful of both dimensions and file size:
- The image dimensions should be as wide as they need to be and preferably no more
- The file size should be as small as possible without noticeable loss of quality
My preferred workflow
- Identify the image you want to upload. This could be your own image, or one you have permission to use like a stock photo.
- Copy the image so that you keep the original. (It’s very important to keep the original image.)
- Rename the copy with a name that means something. So your original might be called IMG_0167.JPG and your filename might be toy-robot.jpg.
- Identify the maximum width you want the image to have. (Theme-dependent, remember.)
- Go to a photo editing tool and make your photo that width. Keep the proportions so your image does not stretch.
- Save the picture for Web.
Optional step: Go to TinyPNG.com and upload the image there. This will compress it further. Download the resulting file.
When adding to a post or page, make sure that you use the following options:
- Set alt text – describes the image for visually impaired people
- Select the alignment on the page – your choices are none, left, right or centre. I prefer to centre or right align images.
- Select the size to display – thumbnail, medium, large or full size.
I don’t know what size my previously uploaded images are…
Find out the dimensions
Install the PMR | Add Image Dimensions Columns plugin.
This will give you the width and height of each image in your Media Library.

If you have some really large images, sit down and catch your breath. We’ll tackle that next.
Editing large images in the Media Library
Before you begin, make a backup – you will be changing the image sizes permanently.
WordPress actually has basic image editing tools built in.
It’s most important to get the dimensions of a large image reduced, as that will reduce the file size naturally.
You can do this by clicking the Edit link for an image in the Media Library. Then select the Edit image button on the Edit Media page (underneath the picture).
On the Edit Media screen, change the size in the Scale image boxes.

The default is to apply the change to all image sizes. I recommend you stick with this.
Click the Scale button, then Update.
Unfortunately, if you have a lot of large images, you will have to scale each one separately. There is no bullk scaling option.
After you have done this, you can compress the file size further.
Optimizing your WordPress images with a plugin
You can save even more on image size by using a plugin. This will also optimize all new images you upload.
Install EWWW Image Optimizer.
The settings for this plugin are quite esoteric. Read this article on EWWW for more on its settings. Personally, I assume the defaults are okay.
Once you install the plugin, go in the Media Library and you will see an Image Optimizer column.

This will show you the file size of your media and whether they have been optimized or not.
If it says Not processed, you can run the optimizer to reduce the file size.
If you see No savings, great – it’s already a small file size.
You can also go to Media > Unoptimized Images to see what hasn’t been done.
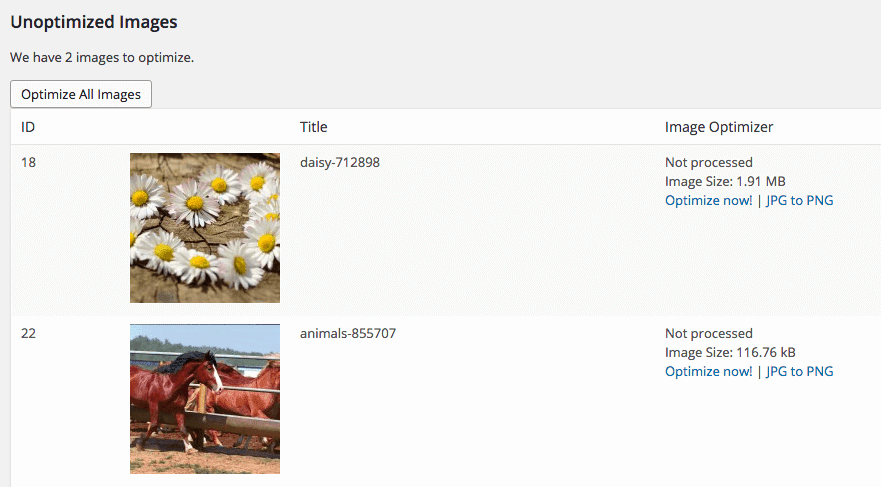
You can optimize on an individual basis, or choose the Bulk Optimize option.
I recommend that you take a backup first before running the optimizer.
This should help reduce your image sizes to a reasonable level.
There are further measures you can take to improve your site speed, but this is a good start.
Did you find this post help you optimize your images for your WordPress site? If so, leave me a comment.
Great post Claire, very informative and useful. Thank you for sharing.
Thanks Vips!
Thank you for some very helpful information on using images in WordPress. I do wish the preferred image size for a theme header was specified on the customization page. I’ve been going by trial and error on some themes.
Thanks Barbara – agreed, it would help a lot if the image sizes were made obvious within the WP-Admin. It seems to be down to the individual theme author as to whether they are specified or not.
Good stuff Claire! http://www.jpegmini.com is a great tool like TinyPng but there’s also desktop/app versions so no need to upload things anywhere – it’s worth every penny!
https://wordpress.org/plugins/ricg-responsive-images/ is also a very nifty way of all responsive image easily into WP.
Thanks for those links James! I’d like to know a bit more about the responsive images plugin. Have you seen it reviewed?
Do you find the $20 version of JPEGmini good enough for most things?
Hi, that ricg group plugin has made it into WordPress core in v4.4. Which is nice 🙂
Oh, that is good news. I heard Bruce Lawson talk about responsive images at WordCamp London and it all seemed so complicated! I’m glad this is going into Core.
hello.
Great and helpful article. Thank you.
Can you recommend preferred/maximum file sizes in KB/MB ?
thanks!
-j
Thanks John.
File sizes – as small as possible without compromising on quality. You might need to experiment.
There are some suggestions at the end of this article, though I think these figures might be a bit optimistic: Tips for optimizing your web images
Hey, Claire Thank you for sharing a piece of information about WordPress. I am a blogger and working on my website to get more organic traffic. Your ideas all are pretty good and I’m going to establish these on my website.