I made my first screencast and published it a few days ago. It was a labour of love. I wouldn’t have started without the support and encouragement of Spence and Cheryl from 1wd.tv.
I learned a lot about the whole process, from preparation to recording to editing, which I will share here.
What did I learn about creating a screencast?
1. You need a good microphone
I used the Blue Snowball microphone (available from Amazon.co.uk).
Do not forget to set the mike as your input source when you start your recording! I had a few attempts before I realised that I had the built-in microphone selected as the sound source.
Using the Snowball, set it to position 1 which is optimized for voice recording.
2. Boost the volume before you record yourself
I set the volume too low and had to increase it later in the edit. I was advised to set it to maximum and then reduce it down a bit.
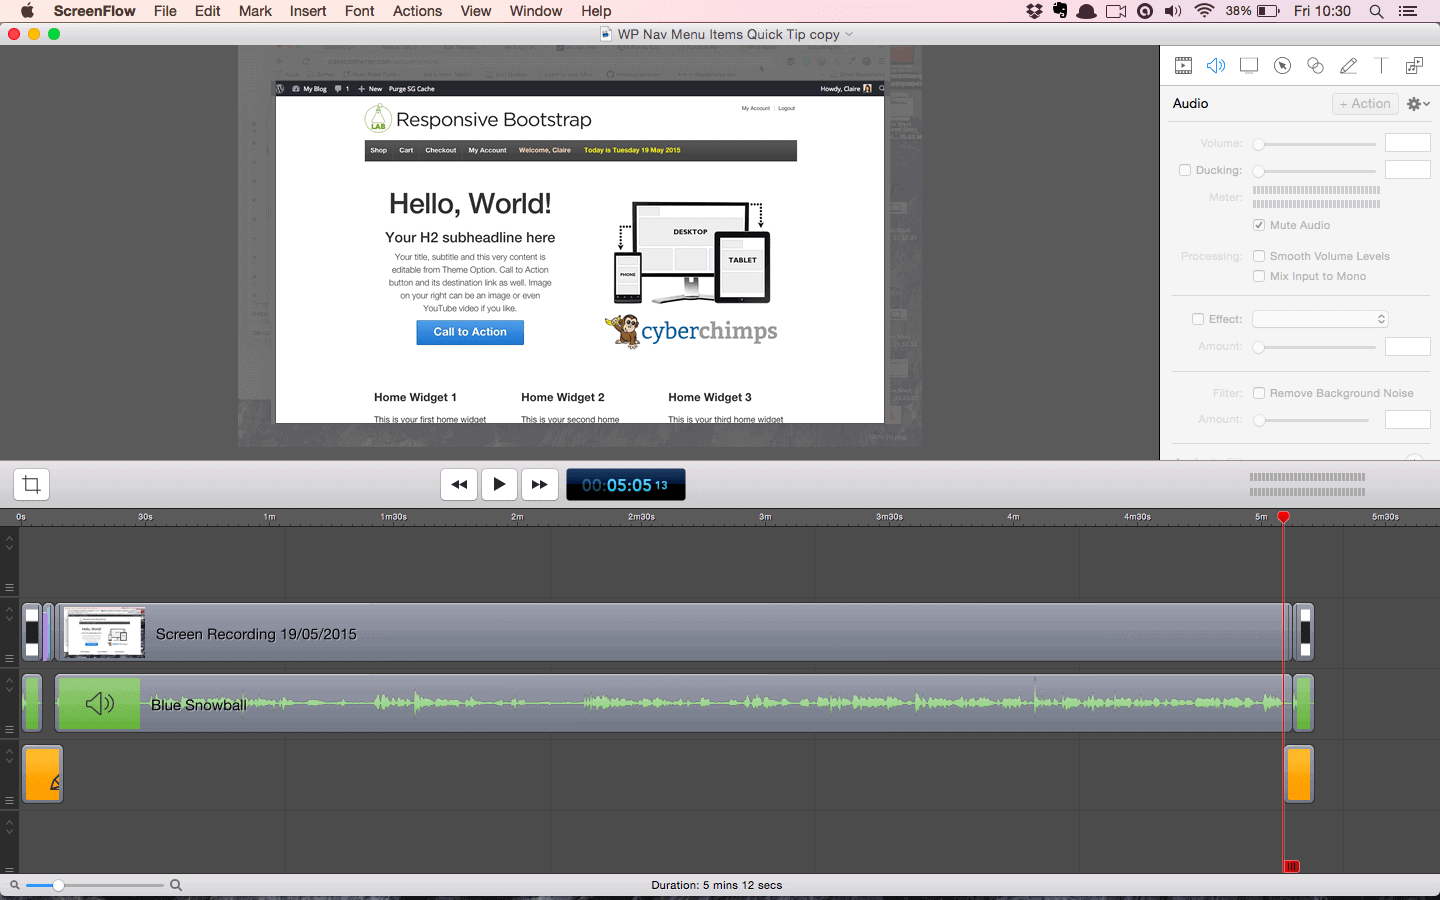
3. Screenflow is a good all-rounder as video recording software goes
There are a number of different screencasting tools, some free and some paid. I used Screenflow (Mac only) which I got on a special deal from TNW Deals. Otherwise it’s currently about £75 to buy.
Screenflow has editing tools including the ability to add multiple video and audio tracks, add transitions, annotate video and crop your video.
A free screencast tool you can use is Veed Screen Recorder.
4. Set your windows to the appropriate size
Screenflow will record the whole screen, and you can crop down later to show the portion you want. Make sure that the window your recording focuses on is the right size.
For HD video the size you want is 1280 x 720 px. I was given a lovely red rectangle of that size which I opened in my browser and resized the browser to match. Moom for Mac (free trial then $10) will also do the job.
5. Turn on the Tap to click option for Mac
To avoid the sound of noisy mouse clicks in your screencast, go to System Preferences > Trackpad and enable the Tap to click option. Then you only need to tap for a mouse click… much quieter!

6. Have some idea of what you are going to say
You don’t have to script out what you’re going to say word for word – that could sound too stilted – but it helps to scribble down the key points, and your introduction and concluding remarks. Bonus points if you include a call to action at the end.
7. Do practice runs of your video recording
Take the time to set up what you are going to demonstrate beforehand, including any websites or software you use or want to mention.
Don’t expect to get your recording right first time. I needed a few goes before it went smoothly.
Keep the early attempts – there’s always something you can learn from them. Even if it’s just to see where you ran out of things to say!
8. Editing a video takes the real time
It took me over an hour to edit my five minute video, with a lot of help. I had to assemble the different tracks including a title card at the beginning and end with guitar sound, the video’s title and my audio and video. They had to be kept in sync and I had to add dissolve transitions too.
It brought back memories of my previous foray into video editing using Final Cut Pro in a student project, where I had to make a music video.
Fortunately, now that hard work is done I can re-use many of the same assets in a future project.

9. Learn the Screenflow keyboard shortcuts
Keyboard shortcuts save you time when editing. A few useful ones I picked up were:
CTRL-N: Enable snapping in the canvas and timeline
CMD-Shift-T: Trim content
CMD-G: Group clips
See the full list of Screenflow keyboard shortcuts (PDF).
10. Uploading a video to YouTube is ridiculously easy
Just log into a YouTube account with a channel and hit the Upload button. Choose the privacy setting and, er, upload a video. Then wait until it’s done.
I’ve now created my own YouTube channel. That’s pretty easy too if you have a Google account.
11. Read Shawn Hesketh’s screencast tips
Shawn Hesketh has written a great post on his own blog, How to Create Screencasts that Don’t Suck, where he explains everything you need to know to make a quality screencast.
12. Have fun!
Enjoy making your screencast, and your audience will enjoy viewing it.
The end result…
I hope this list of things you need to know about screencasting helps you if you are starting out on making your own screencast videos.
Let me know what you think by leaving a comment or contacting me.
Leave a Reply